How to set up Ossec on an Ubuntu container
Created by Admin at 15-05-2020 11:11:11 +0200Ossec is an open source intrusion detection system you can use to monitor multiple server, or simply one, to give you a real-time view of what's happening on your servers from one centralized location. In this tutorial we'll go over how to install Ossec step by step, so you can use this software on your projects as well!
Before we start, we need a Linux Ubuntu installation. We'll skip that step in this tutorial since you can easily get a default linux installation on one of the containers on the www.cloudcontainers.net site.
This tutorial is based on the cloud containers created on the my.cloudcontainers.net page. This means that you are by default the root user, so all of the commands below don't make use of sudo. If however, you're not the root user on your system, you'll have to add "sudo" in front of the commands found in the guide below.
Essentials
It's always good practice to start off by updating our current packages:
apt update && apt upgrade -y |
Next, you'll need a few dependencies such as Apache and PHP:
apt install -y build-essential gcc make apache2 libapache2-mod-php7.0 php7.0 php7.0-cli php7.0-common apache2-utils unzip wget sendmail inotify-tools |
Installing Ossec
Now we have our dependencies installed, we can download the latest package on Ossec's download page.
Use the latest source in the command down below:
wget https://github.com/ossec/ossec-hids/archive/3.0.0.tar.gz |
Extract the file, navigate into the extracted folder and run the install script:
tar -xvzf 3.0.0.tar.gz cd ossec-hids-3.0.0/ sh install.sh |
You will now be prompted for a language. You can use whichever you prefer, it doesn't make any difference for the installation.
1- What kind of installation do you want (server, agent, local, hybrid or help)?
Choose local, so we can monitor the server we install Ossec on.
Choose server, if you want to monitor other servers as well.
2- Setting up the installation environment. Choose where to install the OSSEC HIDS [/var/ossec]
Choose /var/ossec.
3- Configuring the OSSEC HIDS. Do you want e-mail notification? (y/n) [y]
Press y if you want to receive e-mail notifications.
You'll be asked for your e-mail address. For SMTP server, just use "localhost".
3.2- Do you want to run the integrity check daemon? (y/n) [y]:
Press enter to run it.
3.3- Do you want to run the rootkit detection engine? (y/n) [y]:
Press enter to run it.
3.4- Do you want to enable active response? (y/n) [y]:
Press enter to enable it.
- Do you want to enable the firewall-drop response? (y/n) [y]:
Press enter to enable it.
- Do you want to add more IPs to the white list? (y/n)? [n]:
Add more IP's to the displayed white list if necessary. Press enter to continue
Press enter to finish the installation script.
After the installation has completed, you can now start, stop and restart Ossec using the following commands:
/var/ossec/bin/ossec-control start /var/ossec/bin/ossec-control stop /var/ossec/bin/ossec-control restart |
Next, we'll need to modify Ossec's config file a little so it'll actually send the right email notifications.
Open up the config file:
nano /var/ossec/etc/ossec.conf |
On the top of this file, you'll find the section looking like this. This is where you'll find the configurations you put in during installations, you can change these settings whenever you want.

For now, we'll only modify a minor change. Since the newest version there is a small bug that makes the smtp_server tag not accept localhost, or it doesn't work. So we'll add 127.0.0.1 here, which means the same, however this does work. Also make sure you're sending e-mails from ...@localhost or domain.
Change it like this, of course, leave your own e-mail address unchanged:

If you want Ossec to also send e-mail notifications when new files are added, you can add the following line in the syscheck block:
yes |
Like this:

In order to enable Ossec to report changes real-time, we'll need to edit some tags. Right below the line we just added, you'll find the following segment:

We need to change these lines here so they report_changes in realtime. Add the following tags:
report_changes="yes" realtime="yes" |
Like this:

Save and close the config file.
Next we'll edit the file concerning rules a new file added to the system has to comply with.
Open the local_rules.xml file:
nano /var/ossec/rules/local_rules.xml |
Add the following rule:
     ossec
     syscheck_new_entry
     File added to the system.
     syscheck,
Save and close the xml file.
Restart ossec. If you get any errors, make sure you have no typos in any of the configurations we've just made.
/var/ossec/bin/ossec-control restart |
Ossec's web-interface
In order to install Ossec's web-interface, we'll need to download its source from Github:
wget https://github.com/ossec/ossec-wui/archive/master.zip |
Unpack the zip file:
unzip master.zip |
Then move the directory to apache's web directory:
mv ossec-wui-master /var/www/html/ossec |
Next, install it using the setup script:
cd /var/www/html/ossec ./setup.sh |
You'll be prompted a few questions, we're going to set up an admin account.
Use admin for username, choose a strong password and use www-data for server user name. Like this:

Restart apache for our changes to take effect:
systemctl restart apache2 |
You can now acces the Ossec web-interface by, in your browser, navigating to your server's IP followed by "/ossec"
84.97.153.114/ossec |
The web-interface:
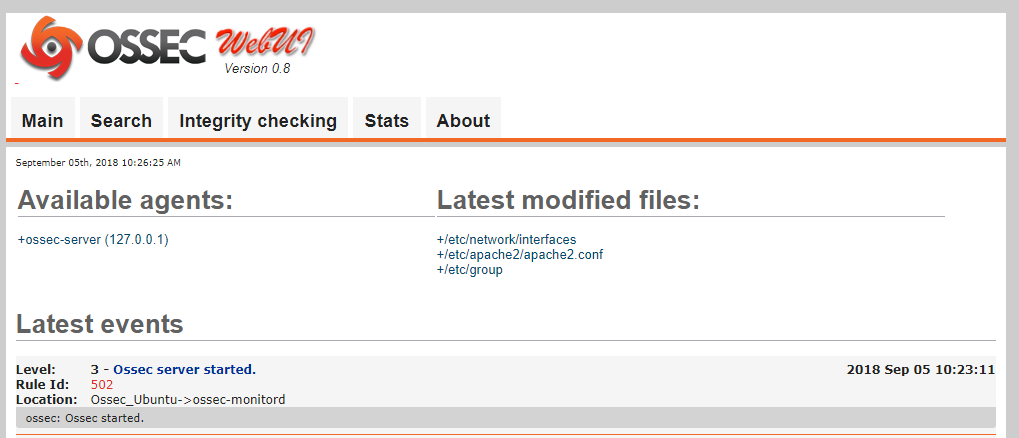
Congratulations, you've just installed Ossec on your VM!
Try editing files like /etc/network/interfaces, /etc/rc.local, /etc/aliases. If everything is correct you should see the event show up on the web-interface and you should receive an e-mail.
Note that they'll probably, by default, end up in your spam folder.
Installing Ossec agents on servers you want to monitor
Even though you could, you probably don't want to monitor just one server. Ossec uses agents to monitor other servers. They're created on the main server we just configured and installed Ossec on, and are later imported to the server you actually want to monitor.
Ossec server
First, we create the agent. Open the menu we use to manage our agent(s) using the following command:
/var/ossec/bin/manage_agents |

Choose A to add an agent.
You'll be asked to:
- Provide a name for the agent
- The IP of the server to be monitored - you can use a range or "
any" if the IP might change over time. - An agent ID
Confirm your agent's settings by entry y.
Extract your agent's key by choosing E and providing the according agent's ID. The key is encoded in a string:

You'll need this key to import the agent to the other server later on.
Quit the menu by choosing Q.
Restart Ossec:
/var/ossec/bin/ossec-control restart |
Server to monitor
Log in to the server you want to monitor. We'll install Ossec here as well, but instead of the local/server distribution, we'll choose agent.
First update your packages:
apt update && apt upgrade -y |
Install Ossec's dependencies againL
apt install -y build-essential gcc make apache2 libapache2-mod-php7.0 php7.0 php7.0-cli php7.0-common apache2-utils unzip wget sendmail inotify-tools |
Download the latest package on Ossec's download page.
Use the latest source in the command down below:
wget https://github.com/ossec/ossec-hids/archive/3.0.0.tar.gz |
Extract the file, navigate into the extracted folder and run the install script:
tar -xvzf 3.0.0.tar.gz cd ossec-hids-3.0.0/ sh install.sh |
You will now again be prompted for a language. You can use whichever you prefer, it doesn't make any difference for the installation.
1- What kind of installation do you want (server, agent, local, hybrid or help)?
Choose agent, so we can import the agent created on the
2- Setting up the installation environment. Choose where to install the OSSEC HIDS [/var/ossec]
Choose /var/ossec. -just press enter.
3- Configuring the OSSEC HIDS.
Provide the IP of the Ossec server.
Answer yes to all the other questions.
We can now, once again, open up the agent manager using this command:
/var/ossec/bin/manage_agents |
Choose I to import the agent we've just created.
Paste the key in here.
Confirm the agent's settings.

Quit the menu using Q.
Restart Ossec:
/var/ossec/bin/ossec-control restart |
Your agent should now be added to the Ossec server!


Comments are turned off.