How to install Wordpress on a Debian 10 VM
Created by Admin at 02-06-2020 13:27:14 +0200WordPress is an online, open source tool that makes building websites not only easier, but faster as well. It is by far the most well known content management system (CMS). Initially for blogs, but nowadays the multitude of available (and free) plugins have opened up WordPress for many more purposes than just blogging: webshops even. In this tutorial we'll be going over how to install WordPress step by step, so you can get your website up and running as soon as possible!
Before we start, we'll need a Debian 10 VM. We'll skip that step in this tutorial since you can easily get a ready new Bhyve through Cloudcontainers.
Note that since you're logging in as another user than the root user you'll need to make use of the sudo keyword, as opposed to our other tutorials on vm's.
Preparation
To start off, it's always good practice to first update our current packages:
$ sudo apt update && sudo apt upgrade -y
Before installing Wordpress we'll need to install a LAMP stack, a combination of software packages to run our webserver (Linux, Apache, MariaDB & PHP).
Additional PHP modules
With LAMP/LEMP you've already installed PHP, however, you might not have all PHP modules we're going to need for our WordPress installation. Use the following command to make sure you have all the correct PHP modules installed:
$ sudo apt install php-curl php-gd php-mbstring php-xml php-xmlrpc php-soap php-intl php-zip -y
Setting up the WordPress database
Next, we'll need to create a database for WordPress to use. For this, we could either use the regular MySQL administrator (root, most likely), or create a separate user for WordPress to use. In this tutorial we'll be creating a separate user solely for WordPress' database.
Enter the MariaDB terminal
$ sudo mariadb

# OR login with a custom user
$ sudo mariadb -u USER -p
We'll first create a WordPress user, you could name it whatever you want but sticking to wordpress will keep things more clear and straightforward. Remember to set a good password as well!
CREATE USER 'wordpress'@'localhost' IDENTIFIED BY 'wordpress_password';
Now we have created our user, we are going to make a database which we will later grant our new user all privileges to. Create the database:
CREATE DATABASE wordpress_db;
Select our newly created database:
USE wordpress_db;
Grant our WordPress user all priviliges to this database:
GRANT ALL ON wordpress.* TO 'wordpress'@'localhost' IDENTIFIED BY 'wordpress_password';
Next, we reload MySQL's grant privileges tables to make our changes take effect:
FLUSH PRIVILEGES;
Exit the terminal:
EXIT;
Install Wordpress
Now we have prepared our server to host our WordPress website, it's finally time to install WordPress itself.
Download and install WordPress
Since you might be using this server to host other services as well, navigate to your html folder and install WordPress here:
$ cd /var/www/html
Download and unpack the latest version of WordPress:
$ sudo wget -c http://wordpress.org/latest.tar.gz && sudo tar -xzf latest.tar.gz
You can now remove the .tar.gz package to preserve disc space:
$ sudo rm latest.tar.gz
Configuring WordPress
You will now have the WordPress directory next to you index.html file. The next step is to give the WordPress folder the proper permissions using the following commands:
$ sudo chown -R www-data:www-data /var/www/html/wordpress
$ sudo find /var/www/html/wordpress/ -type d -exec chmod 750 {} \;
$ sudo find /var/www/html/wordpress/ -type f -exec chmod 640 {} \;
Navigate into your WordPress folder:
$ cd wordpress
Configure Apache
Next we'll need to configure our webserver to server WordPress upon visiting our server's address. To achieve this we can use the default 000-default.conf file, open it and edit the document root as shown below:
        #ServerName www.example.com

        ServerAdmin webmaster@localhost
        DocumentRoot /var/www/html/wordpress

        ErrorLog ${APACHE_LOG_DIR}/error.log
        CustomLog ${APACHE_LOG_DIR}/access.log combined
Now, restart both Apache and MySQL with the following commands:
$ sudo systemctl restart apache && sudo systemctl restart mariadb
The server-side installation is now finished! In your browser navigate to the IP/domain of your server.
WordPress web configuration
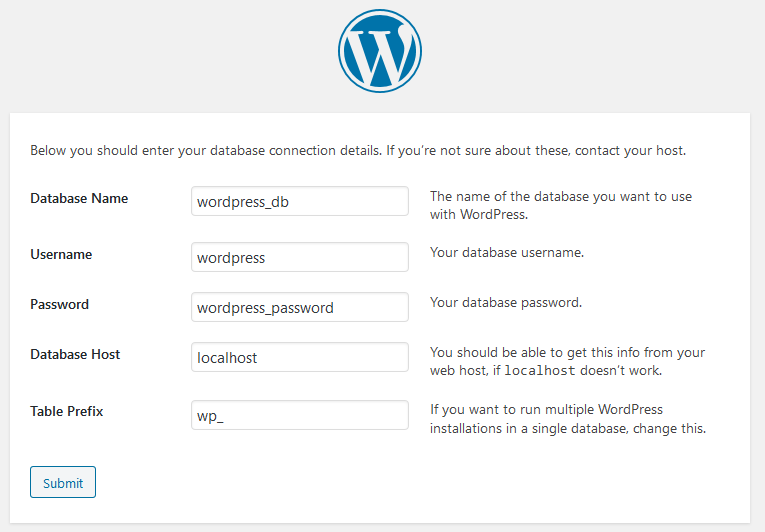
You will enter a page that asks for your preferred language, choose one and click continue. Next, you will be asked for a database- name, username, password and host. These are the data we used when creating a database, fill in these fields accordingly.

If all fields are filled in correctly, next you'll be prompted for informaction concerning your blog such as its title and login credentials. When you're done, press "install wordpress".
Congratulations, you've just installed WordPress on your machine, have fun blogging!

Comments are turned off.