How to setup Zabbix 3.2 on Ubuntu 16.04
Created by Admin at 08-04-2020 11:48:51 +0200Zabbix allows you to monitor all your servers and applications in real-time, in one place. The web interface displays all kinds of data useful to determine the status of your servers, which is extremely handy since it allows you to be notified of any and all problems relating to your servers even before your customers start complaining.
This tutorial is based on cloud containers created on the my.cloudcontainers.net page. This means that by default you are the root user, so all of the commands below don't make use of sudo. If however, you're not the root user on your system, you'll have to add "sudo" in front of the commands found in this guide below.
First we must install Apache, MySQL and PHP (LAMP) on the server where we're going to run Zabbix, before we can install Zabbix. (How to install LAMP on Ubuntu 16.04)
Install Zabbix
After LAMP is installed, we need to make sure all your package's latest versions are installed so no conflicts emerge later on:
apt-get update
apt-get upgrade
Then, we'll install the PHP modules required by Zabbix:
apt-get install php7.0-xml php7.0-bcmath php7.0-mbstring
Now we're ready to install Zabbix. Normally we'd use Ubuntu's integrated package manager, but since its version of Zabbix is outdated we'll make use of the official Zabbix repository using the following two commands:
wget http://repo.zabbix.com/zabbix/3.2/ubuntu/pool/main/z/zabbix-release/zabbix-release_3.2-1+xenial_all.deb
dpkg -i zabbix-release_3.2-1+xenial_all.deb
The next thing we need to do is update the package index, so the Zabbix repository is included.
apt-get update
Now install the Zabbix server with MySQL and the web frontend:
apt-get install zabbix-server-mysql zabbix-frontend-php
Using the Zabbix agent, we can also collect data on the Zabbix server itself:
apt-get install zabbix-agent
In order for us to use Zabbix, we'll first have to set up a database that is going to hold all the data collected bij Zabbix, from its agents.
Create MySQL database for Zabbix
We're going to create a new MySQL user for Zabbix, so Zabbix doesn't need the root account to log in to the database. To create this Zabbix user, we'll first have to log in to MySQL as the root user:
mysql -uroot -p
Then we create a database for Zabbix to use, with UTF-8 character support:
Note that MySQL commands are ended with a semicolon;
create database zabbix character set utf8 collate utf8_bin;
Now we create the database's user, you can change the username and password after your liking:
grant all privileges on zabbix.* to zabbixUser@localhost identified by 'your_password';
Apply the correct priviliges to the user and the databse:
flush privileges;
We can now exit the database console, using the quit command;
quit;
Then we'll have to import the database schema and data, these were already provided by the Zabbix installation.
Running the following command will set it up in the zabbix database:
zcat /usr/share/doc/zabbix-server-mysql/create.sql.gz | mysql -uzabbixUser -p zabbix
You'll be prompted to give the zabbixUser's password.
Next, we'll have to configure the Zabbix server to actually use this database, for this we'll need to open the configuration file and insert the databse password.
vim /etc/zabbix/zabbix_server.conf
Remove the hashtag on the front of the "DBPassword" line and insert your database password like this:

Also make sure that the same user is configured here, as we made in the database:

The Zabbix server configuration should now be finished, however, we need to modify our PHP setup so that Zabbix' web interface will function correctly. When installing Zabbix, automatically an Apache configuration file was created, the only thing we need to change is the timezone that was by default commented out.
vim /etc/zabbix/apache.conf
The file you're looking at will contain a lot of code, we're only interested in this part:
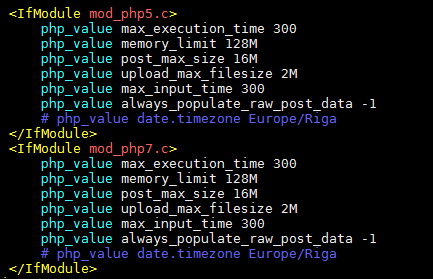
Remove the hashtag to uncomment and apply your own timezone. Available timezone formats can be found on this web page: PHP timezones. So our file will look something like this:
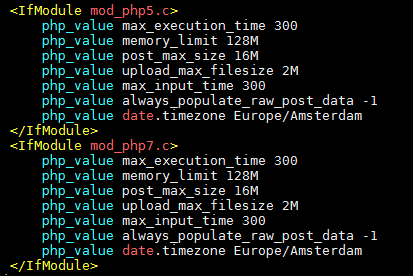
Next, we'll restart Apache:
systemctl restart apache2
Start the Zabbix server:
systemctl start zabbix-server
And perform a status check on the Zabbix server to see if it's running properly:
systemctl status zabbix-server
This is what your status output should look like:

Next, you're going to want to enable the server to start at boot time:
systemctl enable zabbix-server
Zabbix Web Interface Configuration
The web interface allows us to easily acces reports, add hosts to monitor and some other fancy functionalities, but first, we'll need to set that up too. Go to this address in your browser:
http://YOUR DOMAIN or IP/zabbix
Here, you'll find a welcome message, click next step. You'll be directed to a screen that lists all of Zabbix' prerequisites.
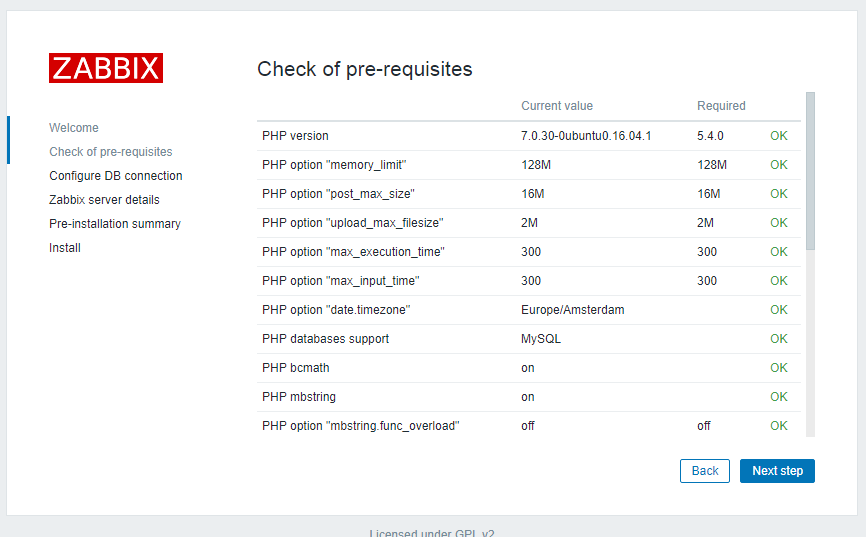
All these values should be marked "OK", so scroll down and verify the are. After that: click next step.
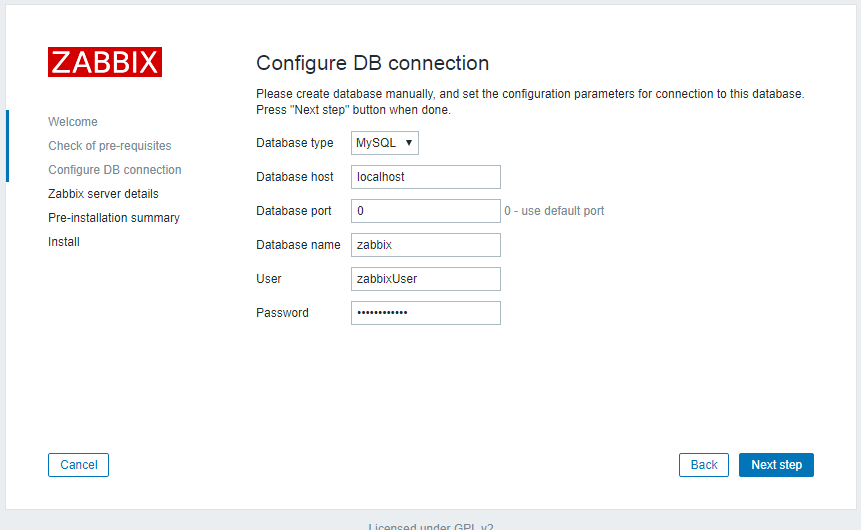
Fill in the credentials as we have just configured them and click next step.
You'll be redirected to the next screen:
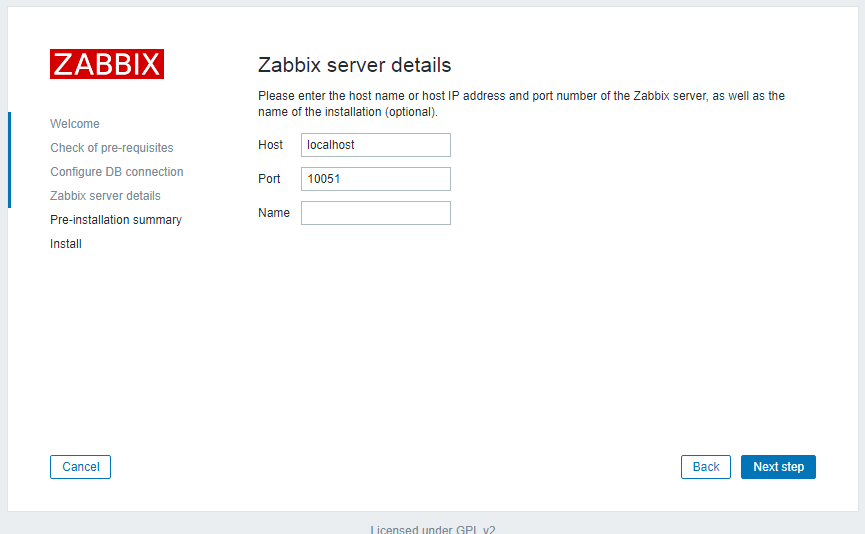
Adding a name her is optional, when you have multiple servers to monitor it might be handy to be able distinguish them.
The next screen will display the pre-installation summary. Verify everything is correct and click finish.
You'll be directed to a login screen: the default user and password are Admin and zabbix.
The web interface setup is now complete. During the setup a configuration file was created, the file is located here:
/usr/share/zabbix/conf/zabbix.conf.php
Install Zabbix Agent
In order for Zabbix to monitor our server, we now need to log in to the server we want to monitor. On this server we'll install and configure our Zabbix Agent.
Just as on the Zabbix server, we can run the following commands to add the repository package, update the package and install the Zabbix Agent:
wget http://repo.zabbix.com/zabbix/3.2/ubuntu/pool/main/z/zabbix-release/zabbix-release_3.2-1+xenial_all.deb
dpkg -i zabbix-release_3.2-1+xenial_all.deb
apt-get update
apt-get install zabbix-agent
Zabbix Agent Configuration
Next we'll configure the Zabbix Agent to form a secure connection with the Zabbix server. Despite the fact that Zabbix does support certificate-base encryption, that's not the goal of this tutorial. Therefore we'll generate a pre-shared key (PSK) to form a secure connection between the agent and the server.
Generate a PSK:
sh -c "openssl rand -hex 32 > /etc/zabbix/zabbix_agentd.psk"
Show the key, so you can save it somewhere. You'll need it later on to link the server to Zabbix through the web interface.
cat /etc/zabbix/zabbix_agentd.psk
It will look approximately like this:
888f61c9100fa177767e2a8107eafb50930cacbaad151c7eb785755aabe53330
Now we're ready to actually configure the Zabbix Agent, open the configuration file:
vim /etc/zabbix/zabbix_agentd.conf
In this file, we're going to edit a few things, starting with the IP address of our newly setup Zabbix server:
By default the server IP will be 127.0.0.1, change this to the IP address of your Zabbix server.
When configuring the Zabbix Agent on the Zabbix server itself, the default 127.0.0.1 (localhost) is fine.

Then we'll edit the TLSConnect section, uncomment the TLSConnect line and insert "psk"

Then we'll configure the secure connection to the Zabbix server using our PSK. Find the TLSAccept section, uncomment the TLSAccept line and add your generated PSK.

The next section we'll need to modify is the TLSPSKIdentity section. You'll need to uncomment the TLSPSKIdentity line and insert a unique piece of text which will be used to add a host in the Zabbix web interface.
Note: The string must be unique. You can not use the same string on different servers.

Finally, we'll need to point the Agent to file that contains the key you just generated.

Now save and close the file.
The next two commands will start the Zabbix Agent and tell it to start at boot time as well:
systemctl start zabbix-agent
systemctl enable zabbix-agent
To check the Zabbix Agent's status:
systemctl status zabbix-agent
Now repeat the process of installing and configuring the Zabbix Agent for the Zabbix server itself.
Adding the host to the Zabbix Server
After installing the agent on the server that's to be monitored, we still need to register the host on the Zabbix server. We do this through the web interface.
After logging in go to Configuration>Hosts>Create host (top right corner)
This will direct you to the configuration page:
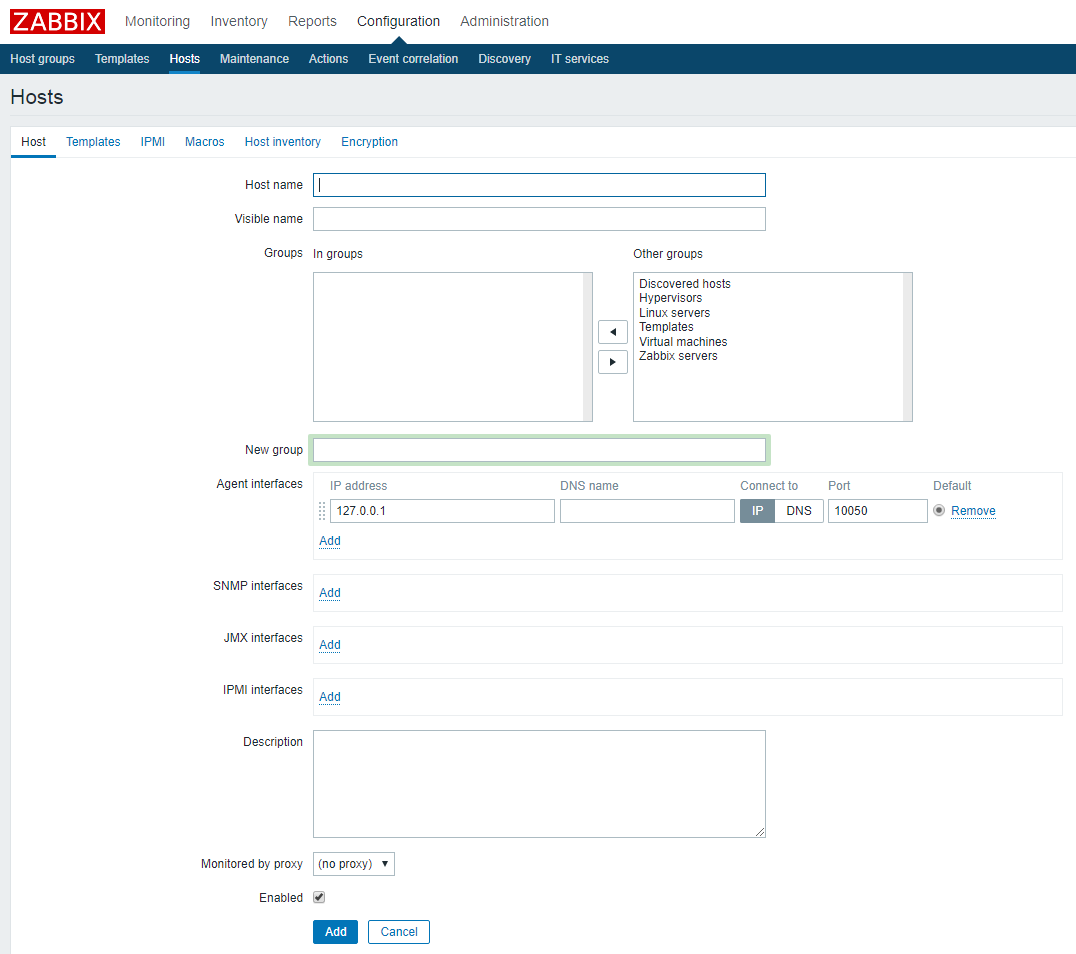
Fill in the Host name and the IP address of the server you want to monitor and add host to a group. You can either make a group yourself, or pick a default choice. The Linux servers group is good for now.
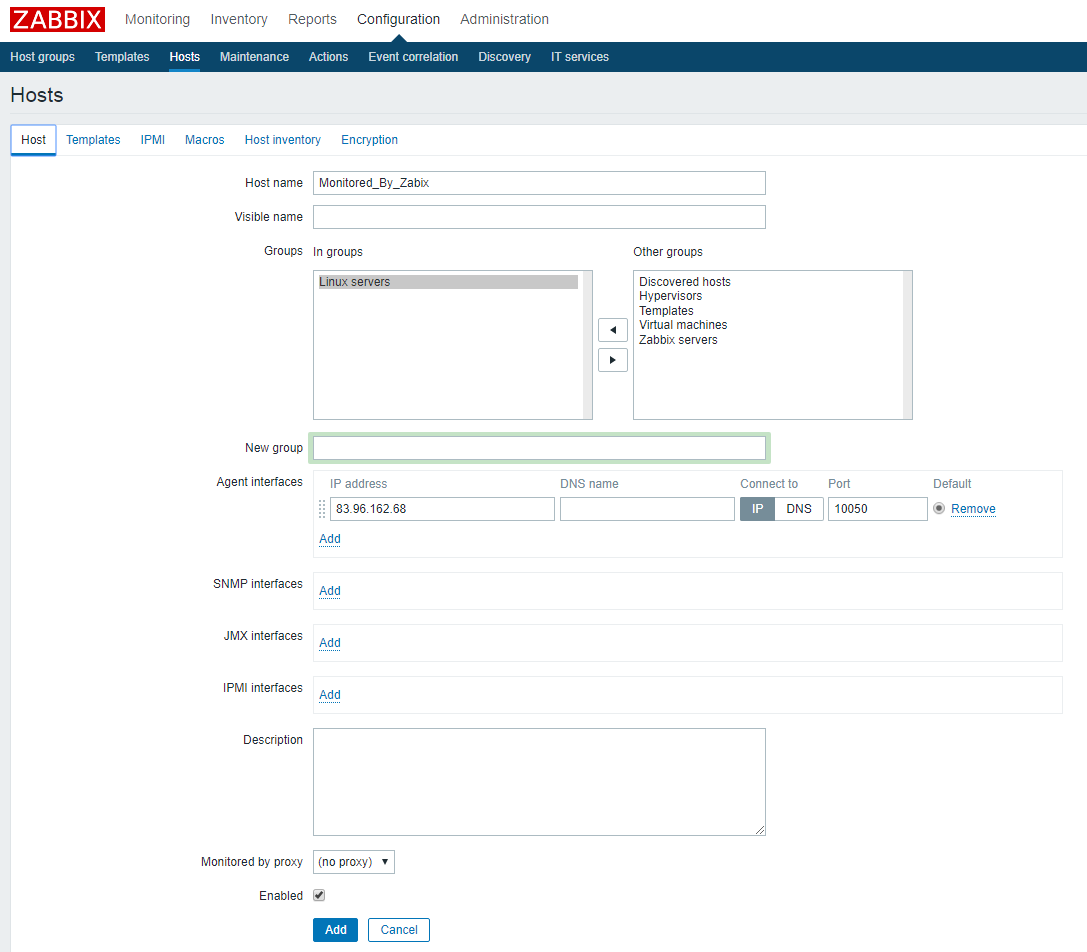
After you've filled in the required information, go to the templates tab. Here, search for the "Template OS Linux" and add this template to your host by clicking "Add" after you've selected it.
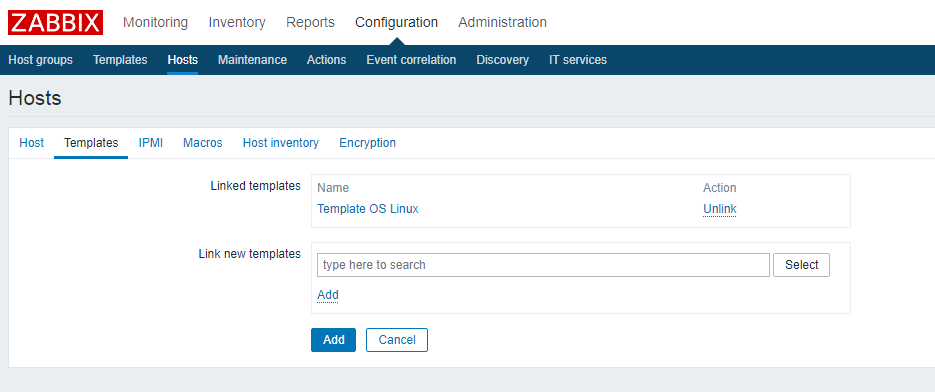
Next, go to the encryption tab. Select PSK for Connections to host, as well as Connections from host.
Fill in the PSK identity string that we just set in the configuration file of the Zabbix Agent, as well as the PSK key we generated.
If you haven't copied the PSK key, you can find it on the agent machine: /etc/zabbix/zabbix_agentd.psk
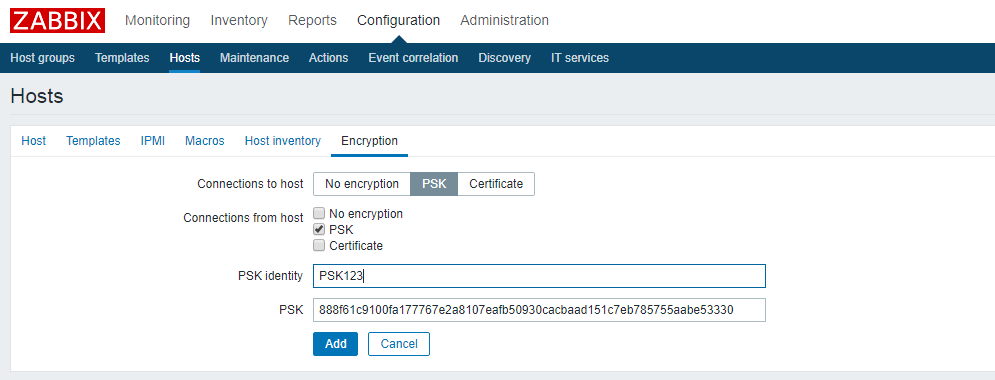
Click the Add button. Your host will be added to the list, where you can check up on your servers' status.
Congratulations, you've now installed Zabbix!

Comments are turned off.